Checkout: Quickstart
Introduction
Our Checkout page (Hosted Payment Page) is a ready-to-go solution that allows quick and easy integration with Spoynt. You only have to redirect your customers to the payment form we give you. There’s also no need for you to pass any PCI scans or have an SSL certificate (though having one is always recommended), since the actual payment is submitted via our secure payment page.
Try it out
Why not give Checkout a test run? Click the Pay Now button below and the form will spring to life.
Customer Journey
Spoynt Commerce Checkout is a secure hosted payment page, where you can redirect customers from your website to make a payment through Spoynt. Commerce Checkout provides customers with access to a range of payment methods, based on their location and your account and integration settings. Integration to Commerce Checkout is simple and requires collecting customer payment information on your website in a standard HTML form and submitting this to Spoynt.
Commerce Checkout then collects the customer payment details needed to complete the payment, and sends these details to the relevant bank or payment provider for authorisation. After the payment is complete, the customer is returned to your website and you receive a real-time notification of the payment, which includes details of the transaction.
A simplified illustration of the Spoynt Checkout payment flow is shown in the figure below.
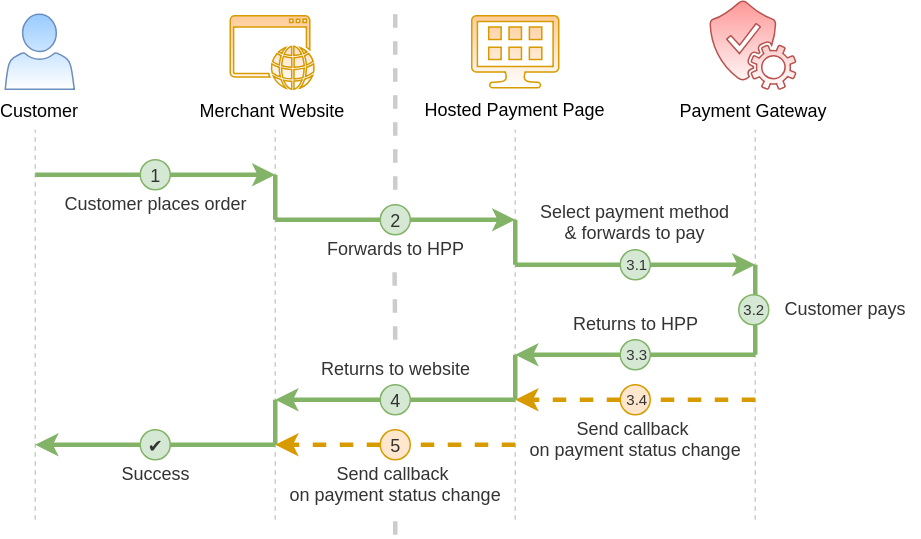
Full customer journey details
- A customer on your website decides to check out.
- Your website redirects the customer to the Checkout on the Spoynt platform by submitting HTML form or calling the Private API with Payment Invoice data: the amount, a payment description, a Callback URL, and a Return URL we should redirect the customer to after the payment is made.
- The customer reaches the Checkout, chooses a payment method and makes the payment. This process is entirely taken care of by Spoynt. You don't need to do anything here.
- At this point, Spoynt returns the visitor to your website using the
return_urlspecified in the payment creation. Your website already knows the payment was successful and thanks the customer. - When the payment is made, Spoynt calls your Callback URL informing your website about the payment’s invoice status change. That's why you should define a Callback URL when creating the initial payment.
In response to your callbacks being called your application needs to issue a 200 OK status. From that response, Spoynt can recognise that your processing of the new status was successful–for any other response, we keep trying.
This fetched status serves you to mark the payment as paid, trigger fulfilment and send out an email confirmation to the customer.
Requirements
Our Checkout is the easiest and the quickest way to integrate a payment page into your website. No coding knowledge is required. But your requirements should satisfy the below conditions:
- You do not have an user authentication or management system at your end and you rely on Spoynt for providing it.
- Only after completing checkout, end users are allowed to access your product or service.
You can integrate with any of our payment page experience offerings. Choose from one of our simple hosted solutions: Payment Widget or Payment Link which are based on Commerce HPP API.
Integration methods
Read about our integration methods below, then choose the one that best suits your needs.
Payment Widget

Payment Widget is our simplest integration method and requires little technical know-how. It's a payment lightbox that you can add to your website without redirecting a client to the separate payment page.
Widget is integrated directly to the website page: the client selects a payment method, fills out payment details and confirms the payment inside it.
<script src="https://unpkg.com/@paycore/merchant-widget-js@0.3.0/dist/merchantWidget.umd.js"></script>
<div id="merchant-widget-mount-point" style="width: 375px; height: 600px;"></div>
<script>
    window.widget.init({
        public_key: "your_public_key", // replace the value with your commerce public key
        baseUrl: "https://api.spoynt.com/hpp/",
        flow: "iframe",
        selector: "merchant-widget-mount-point",
        amount: 10,
        currency: "USD",
        language: "en",
        description: "Simple description of your payment operation.",
        reference_id: "",
        metadata: {
            key: "value"
        },
        display: {
            hide_header: false,
            hide_footer: false,
            hide_progress_bar: false,
            hide_method_filter: false,
            hide_lifetime_counter: false
        }
     });
 </script>
Payment Link

Payment Link is a quick and easy solution for accepting payments. Just create (optionally customise) a Payment Link, then copy and paste the HTML code snippet to your website.
The simplest case would involve an HTML form with specific information that would be sent via a GET request. There's no need to require any the data from your customers, so all the fields will be hidden in most cases.
Here's how it can look like:
<form action="https://api.spoynt.com/hpp/" method="get">
    <input type="hidden" name="public_key" value="your_public_key" /> <!-- replace the value with your commerce public key -->
    <input type="hidden" name="description" value="Some goods" />
    <input type="hidden" name="amount" value="100" />
    <input type="submit" value="Pay" />
</form>
<!-- replace the value with your commerce public key -->
<a href="https://api.spoynt.com/hpp/?public_key=your_public_key¤cy=USD&description=Some goods&amount=100" target="self" />
<!-- replace the value with your commerce public key -->
<img alt="Payment Link" src="https://chart.googleapis.com/chart?chs=250x250&cht=qr&chl=https://api.spoynt.com%2Fhpp%2F%3Fpublic_key%3Dyour_public_key%26currency%3DUSD%26description%3DSome%2520goods%26amount%3D100">
Widget vs Link
| Feature | Payment Widget | Payment Link |
|---|---|---|
| Technology | JavaScript | HTTP GET Request |
| Request Validation | ✔ | |
| Error & Event Handing | ✔ | |
| Invoicing via Email or SMS | ✔ | |
| Invoicing via QR-code | ✔ |
Alternative methods
To read about all API features and the complete list of supported methods, go to the Integration section.
Tip
All integration methods are described below, as well as briefly in the article Accept payments. If you haven't read it yet, now is the time to get a better grasp of the system and to choose a method that suits your business.
Basic integration
Before you start
Make sure you have your public_key. You can find it in the Dashboard, in Account Settings → Integration. If you do not have an account, but you want to try an integration with Spoynt, contact our support service to get a temporary test account.
Step 1: Pick an integration method
First, you need to choose an integration method. We offer two ways to integrate Checkout into your website, so you can pick the one that best fits your requirements.
Make sure you decide on the appropriate integration method.
Step 2: Add the code snippet to your site
Copy the code snippet for your chosen method and add it to your checkout page.
    <script src="https://unpkg.com/@paycore/merchant-widget-js@0.3.0/dist/merchantWidget.umd.js"></script>
    <div id="merchant-widget-mount-point" style="width: 375px; height: 600px;"></div>
    <script>
        window.widget.init({
            public_key: "your_public_key", // replace the value with YOUR commerce public key
            baseUrl: "https://api.spoynt.com/hpp/",
            flow: "iframe",
            selector: "merchant-widget-mount-point",
            amount: 10,
            currency: "USD",
            language: "en",
            description: "Simple description of your payment operation.",
            reference_id: "",
            metadata: {
                key: "value"
            },
            display: {
                hide_header: false,
                hide_footer: false,
                hide_progress_bar: false,
                hide_method_filter: false,
                hide_lifetime_counter: false
            }
        });
    </script>
<form action="https://api.spoynt.com/hpp/" method="get">
    <input type="hidden" name="public_key" value="<your_public_key>" />
    <input type="hidden" name="currency" value="USD" />
    <input type="hidden" name="description" value="Some goods" />
    <input type="hidden" name="amount" value="100" />
    <input type="submit" value="Pay" />
</form>
<!-- replace the value with your commerce public key -->
<img alt="Payment Link" src="https://chart.googleapis.com/chart?chs=250x250&cht=qr&chl=https://api.spoynt.com%2Fhpp%2F%3Fpublic_key%3Dyour_public_key%26currency%3DUSD%26description%3DSome%2520goods%26amount%3D100">
Step 3 (Optional): Add callback handler to your backend app
When the payment process is complete, Spoynt sends the details of the transaction to the callback_url page you provided in your payment request with a standard HTTP POST. The Spoynt server continues to post the status until a response of HTTP OK (200) is received from your server or the number of posts exceeds attempts_limit.
More information about handling Callbacks you could find here →
Embed options
We provide two ways to integrate:
- Full-page redirect: Redirect to a customizable payment page. The Checkout is displayed full-page in a browser. After customer redirection to the payment page, they can view the web address for the Checkout.
Full-page redirect examples
<script src="https://unpkg.com/@paycore/merchant-widget-js@0.3.0/dist/merchantWidget.umd.js"></script>
<script>
window.HPPConfig = {
    public_key: "<your_public_key>", // replace the value with YOUR commerce public key
    amount: 100.00,
    currency: "USD",
    description: "Some goods",
    target: "redirect"
};
</script>
<form action="https://api.spoynt.com/hpp/" method="get" target="_self">
    <input type="hidden" name="public_key" value="<your_public_key>" />	<!-- replace the value with your commerce public key -->
    <input type="hidden" name="currency" value="USD" />
    <input type="hidden" name="description" value="Some goods" />
    <input type="hidden" name="amount" value="100" />
    <input type="submit" value="Pay" />
</form>
- Embedded (iframe): Display an overlay payment form on your site. The Checkout is displayed in an iframe or lightbox within your website. When you redirect your customers to our payment page, the web address for your website remains unchanged, providing a more seamless shopping experience. An iframe or lightbox integration requires a more advanced integration.
More about embedding options you could find in our Checkout Reference Guide.
Embedded (iframe) examples
<script src="https://unpkg.com/@paycore/merchant-widget-js@0.3.0/dist/merchantWidget.umd.js"></script>
<div id="merchant-widget-mount-point" style="width: 375px; height: 600px;"></div>
<script>
    window.widget.init({
        public_key: "your_public_key", // replace the value with YOUR commerce public key
        baseUrl: "https://api.spoynt.com/hpp/",
        flow: "iframe",
        selector: "merchant-widget-mount-point",
        amount: 10,
        currency: "USD",
        language: "en",
        description: "Simple description of your payment operation.",
        reference_id: "",
        metadata: {
            key: "value"
        },
        display: {
            hide_header: false,
            hide_footer: false,
            hide_progress_bar: false,
            hide_method_filter: false,
            hide_lifetime_counter: false
        }
    });
</script>
<form action="https://api.spoynt.com/hpp/" method="get" target="payment_frame">
    <input type="hidden" name="public_key" value="<your_public_key>" />
    <input type="hidden" name="currency" value="USD" />
    <input type="hidden" name="description" value="Some goods" />
    <input type="hidden" name="amount" value="100" />
    <input type="submit" value="Pay" />
</form>
<iframe name="payment_frame" src="" id="payment_frame" width="100%" height="600"></iframe>
Use cases
A shopper makes an order for a total amount payable of GBP 100. The order reference in your back office is Internet order 12345.
The order details are:
- Order summary information to display on the payment review page for the order: 1 digital camera
- The order was placed with a unique ID is 12345
- Amount of the order bill is 100 USD
- You want the payment offer to expire on October 11th 2020, 11:00 am
This example represents a complete payment process based on the order details above:
<script src="https://unpkg.com/@paycore/merchant-widget-js@0.3.0/dist/merchantWidget.umd.js"></script>
<div id="merchant-widget-mount-point" style="width: 375px; height: 600px;"></div>
<script>
window.widget.init({
    public_key: "your_public_key", // replace the value with YOUR commerce public key
    baseUrl: "https://api.spoynt.com/hpp/",
    flow: "iframe",
    selector: "merchant-widget-mount-point",
    reference_id: "12345", // The order is placed with unique ID is 12345
    amount: 100.00, // Amount of the order bill is 100 USD
    currency: "USD", // Currency of the order bill is USD
    description: "1 digital camera", // Order summary information to display on the payment review page for the order: 1 digital camera
    expires: 1602414000 // The payment expires on *October 11th 2020, 11:00 am (UNIX timestamp format)
});
</script>
<form action="https://api.spoynt.com/hpp/" method="get">
    <input type="hidden" name="public_key" value="<your_public_key>" />
    <input type="hidden" name="reference_id" value="12345" /><!-- The order is placed with unique ID is 12345 -->
    <input type="hidden" name="currency" value="USD" /><!-- Amount of the order bill is 100 USD -->
    <input type="hidden" name="amount" value="100" /><!--  Currency of the order bill is USD -->
    <input type="hidden" name="description" value="1 digital camera" /><!--  Order summary information to display on the payment review page for the order: 1 digital camera -->
    <input type="hidden" name="expires" value="1602414000000" /><!-- The payment expires on *October 11th 2020, 11:00 am (UNIX timestamp format) -->
    <input type="submit" value="Pay" />
</form>
Other examples:
Payment with customer details
<script async src="https://unpkg.com/@paycore/merchant-widget-js@0.3.0/dist/merchantWidget.umd.js"></script>
<div id="merchant-widget-mount-point" style="width: 375px; height: 600px;"></div>
<script>
window.widget.init({
    public_key: "your_public_key", // replace the value with YOUR commerce public key
    baseUrl: "https://api.spoynt.com/hpp/",
    flow: "iframe",
    selector: "merchant-widget-mount-point",
    reference_id: "",
    amount: 10,
    currency: "USD",
    language: "en",
    description: "Simple description of your payment operation.",
    customer: {
        reference_id: "cus_1234567",
        email: "somename@domain.com",
        name: "John Wick",
        metadata: {
            key1: "SomeValue1",
            key2: "SomeValue2"
         }
 });
</script>
<form action="https://api.spoynt.com/hpp/" method="get">
    <input type="hidden" name="public_key" value="<your_public_key>" />
    <input type="hidden" name="reference_id" value="<your_unique_reference_id>" />
    <input type="hidden" name="currency" value="USD" />
    <input type="hidden" name="amount" value="100" />
    <input type="hidden" name="description" value="Some goods" />
    <input type="hidden" name="customer[reference_id]" value="cus_1234567" />
    <input type="hidden" name="customer[email]" value="somename@domain.com" />
    <input type="hidden" name="customer[name]" value="John Wick" />
    <input type="hidden" name="customer[metadata][key1]" value="value1" />
    <input type="hidden" name="customer[metadata][key1]" value="value2" />
    <input type="submit" value="Pay" />
</form>
Payment with editable amount
<script>
function initPaymentWidget() {
    const amount = document.getElementById("amount").value;
    window.payment_widget.init( {
        public_key: "<your_public_key>",
        reference_id: "<your_unique_reference_id>",
        amount: amount,
        currency: "USD",
        description: "Some goods",
    });
}
</script>
Enter amount:<input type="number" id="amount" name="amount"/><br/>
<input type="button" value="init" onclick="initPaymentWidget()"/>
<form action="https://api.spoynt.com/hpp/" method="get">
    <input type="hidden" name="public_key" value="<your_public_key>" />
    <input type="hidden" name="reference_id" value="12345" />
    <input type="hidden" name="currency" value="GBP" />
    Amount: <input type="text" name="amount" value="100" />
    <input type="submit" value="Pay" />
</form>
Find more about configuration options in the Checkout Reference Guide.
Make Checkout your own
Customisation
Checkout gives you the flexibility to adjust its look and feel to suit your brand and payment page. You can display your company's logo, use custom fonts and add some colour to represent your brand's personality. Contact our support team , and we will design your entire payment page together.
Configuration options
You'll find a list of all the possible configuration options, plus some examples, in our Checkout Reference Guide.
Self-hosted Checkout
Integrating using API provides you with better control. But it requires coding knowledge. Choose this option if you:
- Have the user authentication/management system at your end
- Or need more control than offered by Checkout (like 'price overriding' or changing 'trial end date')
Contact our support for advice and help in setting up your page.
Follow our guide
- To learn which components works with which API, check the Integration Overview.
- Learn more about callback handling.
- Check different use cases and page samples.
- Read the Full Checkout API Reference.